Electric Vehicle Hitch Installation A Step by Step Tutorial
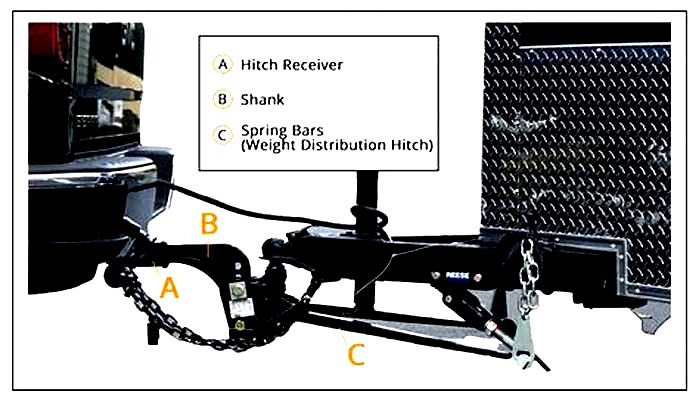
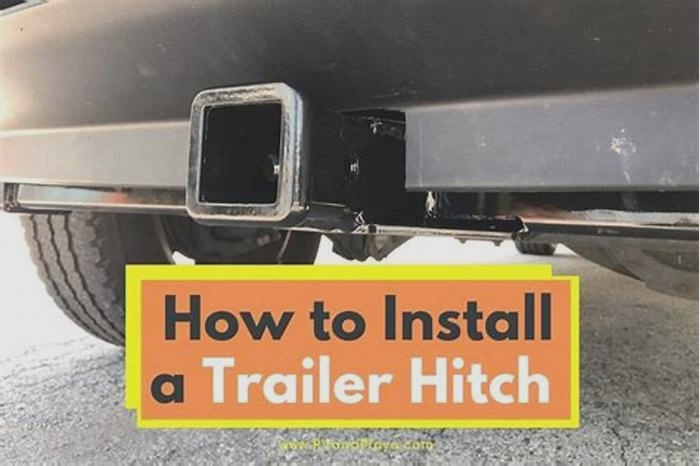
Simple Step by Step Trailer Hitch Installation Guide
Contrary to popular belief, installing a trailer hitch isnt that difficult. All you need is proper guidelines for hitch installation, and some basic tools are required for you to complete this process.
Try to remember some tips we provided below, which will help complete the task more smoothly without any hassle.We are going to explain to youthe exact steps youll need to take to get a trailer hitch installed on either a vehicle or a truck.
You can hire an expert to do it for you, which is good, but youll need to pay the installation fee and installation is not that tough. Well make it easy for you. Go through the whole article, and find the exact answers to the questions you want to know.
Can you install a trailer hitch by yourself and how hard it is?
Yes, you can install it by yourself. Hitch installation is pretty popular these days (and relatively easy). On some cars and with certain hitch types, it can get tricky, but most easy installs just require basic equipment. Once you have the proper knowledge and guidelines, you can hitch your trailer without calling an expert for this job.
How long does it take to install a Trailer hitch?
Installing a trailer hitch depends on your knowledge and your experience. It takes 20-30 min or more, which depends on you. If you are good enough and have done this task several times, then its going to take less time for you.
My personal experience for first-time hitching took 50mins which was too long, and I didnt have any proper guidelines that much, so it was a mess as a first-timer. Also, I made some mistakes and learned from them. But we hope you wont face the same as now we will tell you the easy ways to install a trailer hitch. Keep reading.
Tools required to install the trailer hitch

These are necessary tools that you will need to install the trailer properly to your vehicle. Try to keep them near you whenever youre traveling with your trailer.
- Wrenches
- Torque wrench with the relevant socket for the bolts
- Wheel chocks
- Vehicle jack
- Electric drill
- Wire brush
Step by step Trailer hitch installation Guidelines
Now the main part, here are the steps you need to follow for a proper installation. Please read it carefully to understand it properly:
Step 1: Selecting the Hitch
Selecting a good quality trailer hitch is super important. We like B&W adjustable trailer hitches the most. However, there are a lot of other options as well. So make sure you do your research and find one that will work well with your vehicle. Because every vehicle can only tow a certain amount of weight. You must ensure that the hitch you select can tow the required amount of weight. So, try to be clear about your vehicles weight and how much it can tow easily.
Read:
Step 2: Make sure wheels are Chocked
The first thing youll have to do is chock the wheels. While its rare that your car would move while you install the trailer hitch, its always best to be cautious and alert. Dont let it move frequently.
Step 3: Raise the vehicles rear end
It is better tousea car jack to lift the vehicle, make sure its attached to the appropriate spot on the vehicle, and lift the back. Not necessary it has to be much higher. If youre going to use a vehicle jack, making sure the wheels are choked is extremely crucial.
This is because there will be a higher chance that your vehicle will move. And yes,make sure you know how to use the jack properly. You should be able to learn everything you need to know about your jack by reading the handbook. If you use the jack incorrectly, it could be very dangerous.
Step 4: Getting the Vehicles Rear Ready
You may inspect it somewhere under the back of the vehicle now that you have access. Youll want to make sure there are holes where the trailer hitch may be attached. If there are any holes, clean them out with a wire brush.
To make the process easier, use a small amount of lubricant. And makesure youre using genuine vehicle lubricant in this situation.
Youll need to reference your trailer hitchs instruction manual to figure out what you should do next. This includes determining the hole size and where the holes should be drilled. You must keep a close eye on it because it varies from vehicle to vehicle.
Read:
Step 5: Place the Hitch in Its Proper Placement
Now you must grab a coworker (friends, family members) and ask them to assist you in lifting the hitch into place as single working will be tough in this case. As previously said, this is not a job that you will be able to complete on your own. The hitch will be excessively cumbersome. Make sure everything is aligned with the holes.
Step 6: Carefully secure the Hitch into place
You must take the nuts that come with the hitch and secure them in place. You dont need to tight it that much. They only need to be able to secure the hitch in place while you finish the task.
Step 7: Tight the hitch
The person holding the hitch can relax their grasp after the nuts are in place, and the hitch is placed. Now youll need to get your torque wrench and tighten the nuts to the manuals specifications. As we previously stated, this will vary from hitch to hitch.
Step: Completing the Task
All thats left to do now is remove the wheel chocks and, if applicable, the vehicle lift. The task has now been completed. Please check if the trailer lights are working properly or not.
Things to remember during installing the trailer hitch
Before the installation process, always keep these certain important things in your mind, which help to do your work more smoothly.
It may vary from car to car
However, keep in mind that the procedure may differ from one car to the next as there are a lot of different brands of vehicles in the market. It could also be determined by the sort of hitch you use. So be careful about it at the beginning.
keep the manual with you
Every needed detail is provided accurately by the manufactory company in a manual book. You must keep the trailer hitch documentation before attempting to install it. As in this manual, there is a lot of information that we cannot assume by ourselves properly by watching the hitch. So, keeping the manual makes our work much easy.
Read the manual
This will contain a great deal of information regarding the installation procedure itself. You should pay great attention to the maximum torque specified in the manual, as a lot of information about your vehicle is mentioned accurately by the manufacturers.
Check the tools
Check the tools properly before installing the hitch to see if the tools are working properly. If not, keep a backup or manage that tool from someone else.
keep a partner
Its vital to remember that the installation will necessitate the participation of two people. You wont be able to hoist and bolt in a trailer hitch at the same time since its just too heavy.
Hitch Installation FAQs
How much does it cost to install a hitch?
In general, trailer hitch installation fees vary greatly depending on the installer you select and the type of towing vehicle you intend to use. There are low-priced hitches on the market. For a standard hitch installation, anticipate paying $100 and $150.
Can you attach a trailer to a car without a hitch?
No, its better to have a trailer hitch on your car. A trailer hitch can be installed on any vehicle. These installations are available from the tiniest electric vehicles to the largest trucks. A vehicle with an appropriate hitch is preferred for safety; however, a bumper-pull style trailer can sometimes be pulled a short distance without a hitch. Before proceeding, make sure that towing the trailer on public roads is legal.
You can also watch this trailer hitch installation video by Milanmastracci:
Conclusion
Roaming out with a trailer attached to your vehicle is common now. Often clients come to our hitch repair shop and ask us how to install the hitch. They think they need to call an expert wholl give you the service, but its unnecessary. Its a very simple method now. All you just need to do is follow the guidelines we provided you. And one thing, try to take care of your hitch, which you will attach to your vehicle to last longer and give you a better service for a long time. Once you maintain all of these things, youre good to go!
Read more about trailer hitch:
Mastering Trailer Hitch Installation: A Step-By-Step Guide
Loading... 12 view(s) 5 min read
Mastering Trailer Hitch Installation: A Step-By-Step Guide
Embarking on a trailer hitch installation can seem daunting for many vehicle owners. However, with the right tools, some patience, and a clear guide, you can equip your vehicle to tow trailers, boats, or campers, enhancing its utility and versatility. This article will walk you through the trailer hitch installation process, ensuring you can undertake this task with confidence.
Understanding Trailer Hitches
Before diving into the installation process, its crucial to understand the different classes of trailer hitches and select the one that matches your vehicles towing capacity and your towing needs.
Selecting the Right Hitch
- Class 1 and 2 Hitches: Suitable for light-duty towing, these hitches are perfect for small trailers, bike racks, and cargo carriers. They fit cars and small SUVs, supporting up to 3,500 lbs.
- Class 3 Hitches: The most common type, designed for larger SUVs and trucks, capable of towing up to 8,000 lbs.
- Class 4 and 5 Hitches: For heavy-duty towing requirements, these hitches can handle up to 10,000 lbs and beyond, ideal for large trailers, boats, and commercial use.
Ensure the hitch you choose is compatible with your vehicles make and model. Manufacturers often provide a towing guide to help you determine the appropriate hitch class.
Preparing for Installation
The key to a successful trailer hitch installation lies in preparation. Gather all necessary tools and materials before starting to ensure a smooth process.
Tools and Materials Needed
- Socket wrench set: For tightening bolts and nuts.
- Torque wrench: To apply a specific torque to the hitch bolts, as per manufacturer specifications.
- Pry bar: Helpful for aligning holes during the installation process.
- Jack stands and hydraulic jack: To safely elevate your vehicle for undercarriage access.
- Wire brush and lubricant: For cleaning existing threads or preparing surfaces.
- Drill and metal drill bits: In some cases, you might need to create new mounting holes.
Safety First
Always prioritize safety when working on your vehicle. Use wheel chocks to secure the vehicle from rolling and wear protective eyewear to guard against debris. Ensure your working area is well-lit and free of obstacles.
Step-by-Step Installation Process
Step 1: Vehicle Preparation
Start by securely elevating your vehicle using jack stands. Ensure it's stable before proceeding. Locate the pre-existing holes in your vehicle's framethese will be used for mounting the hitch. Use a wire brush to clean the area around these holes, removing rust and debris.
Step 2: Position the Hitch
Carefully lift the hitch into position against the frame of your vehicle. It can be helpful to have an assistant during this step. If youre working alone, you can use a hydraulic jack to hold the hitch in place temporarily.
Step 3: Secure the Hitch
Hand-thread the provided bolts into the existing holes in your vehicle's frame to secure the hitch. Ensure each bolt is started correctly to avoid cross-threading. Once all bolts are in place, use your socket wrench to tighten them loosely, allowing some movement for alignment adjustments.
Step 4: Align and Tighten with Toque Wrench
Adjust the hitch to ensure it's properly aligned with your vehicle. Once satisfied with the alignment, use a torque wrench to tighten each bolt to the manufacturer's specified torque setting. This is crucial for the safety and longevity of your hitch installation.
Step 5: Additional Components
In some cases, you may need to install additional components like wiring harnesses for trailer lights. Follow the manufacturer's instructions closely for any additional installations.
Step 6: Recheck Connections
After installing the hitch and any additional components, it's crucial to double-check all connections. Make sure every bolt is tightened to the specified torque. This step is vital for your safety and the safety of others on the road. Vibrations and road conditions can loosen fittings over time, so this step ensures everything is secure from the start.
Step 7: Install Wiring Harness
If your towing setup requires electrical connections for trailer lights and brakes, now is the time to install the wiring harness. Route the wiring from the hitch to the vehicle's tail lights. Connect the wires according to the instructions, ensuring a secure and waterproof connection. Test the connection with your trailer or test light to ensure all signals work correctly.
Step 8: Safety Checks and Adjustments
Before you hit the road, conduct a thorough safety check. This includes verifying that the hitch is properly secured, the wiring harness functions correctly, and the trailer itself is correctly attached to the hitch. Check the trailer's brake lights, turn signals, and, if equipped, the brake system. Adjust the hitch ball mount as needed to ensure the trailer sits level when attached to your vehicle.
Step 9: Test Drive
Take a short test drive with your trailer to ensure everything is working correctly. Pay attention to the handling, braking, and overall vehicle performance. Listen for any unusual noises that might indicate a problem with the installation. If everything checks out, you're ready to tow.
How Rigid Hitch Can Help
At Rigid Hitch, we understand that trailer hitch installation can be a daunting task for many vehicle owners. That's where we come in. With years of experience in towing solutions, we're here to support you through every step of the installation process.
All The Information Your Need
Our team of experts is always ready to offer advice and answer any questions you might have about trailer hitch installation. Whether you're unsure about the right hitch for your vehicle, need help selecting towing accessories, or have questions about the installation process, we're here to help.
The Best Products
We offer a wide range of high-quality trailer hitches and towing accessories designed to meet your specific towing needs. All our products are rigorously tested to ensure they meet the highest safety standards, giving you peace of mind when you're on the road.
After-sales Support
For those who prefer professional installation, Rigid Hitch can assist. We can guide you to trusted professionals in your area who can install your hitch quickly and safely. Plus, we're always here to provide post-installation support, ensuring you have everything you need for a successful towing experience.
Mastering trailer hitch installation is a valuable skill that can greatly expand your vehicle's utility. By following this step-by-step guide and leveraging the support and expertise of Rigid Hitch, you can ensure a safe, efficient, and successful installation. Remember, the key to successful towing lies in proper preparation, attention to detail, and ongoing maintenance. Happy towing!

