Fix a Flat Tire on Your Electric Vehicle A Step by Step Guide
Ultimate Guide to Fixing a Flat Tire on Your GOTRAX Electric Scooter
Experiencing a flat tire can be frustrating, especially when you're riding your GOTRAX electric scooter and ready for some fun. But fret not, we're here to provide you with a step-by-step guide on how to fix a flat tire on your GOTRAX electric scooter, so you can confidently get back on the road in no time.
Step 1: Gather the necessary toolsBefore you begin, make sure you have the following tools and equipment at hand:
- An adjustable wrench
- A tire lever or a flat-headed screwdriver
- A bicycle tire pump with a pressure gauge (compatible with your scooter's tires)
- A patch kit or a new inner tube
- Bucket of water and soap (optional)
Step 2: Remove the wheelThe first step is to disconnect the power and turn off the scooter. Then, using the adjustable wrench, remove the nuts that secure the wheel to the scooter frame. Carefully remove the wheel and ensure that there's no damage to the brake system or the electric motor.
Step 3: Inspect the tireBefore trying to fix the flat tire, you need to inspect it for puncture marks, cuts, or other signs of damage. Fill a bucket with water and some dish soap and submerge the inflated tire into it. Look out for any air bubbles this will help you locate the puncture.
Step 4: Remove the tire and tubeOnce you've found the puncture, use the tire lever or flat-headed screwdriver to pry one side of the tire off the rim. Then, carefully pull the inner tube out of the tire and inspect it for any additional damage.
Step 5: Patch or replace the tubeIf the inner tube only has a small puncture, you can use a patch kit to fix it. Follow the instructions provided with the kit to apply the patch correctly. If the tube has multiple punctures or severe damage, it's best to replace it with a new one.
Step 6: Reinstall the tire and tubeAfter fixing the inner tube, insert it back into the tire and make sure it's properly aligned with the valve stem. Carefully put the tire and tube back onto the rim, using the tire lever or flat-headed screwdriver if necessary. Once the tire is fully seated on the rim, inflate it to the recommended pressure using the bicycle tire pump with a pressure gauge.
Step 7: Reattach the wheelFinally, reattach the wheel to the scooter frame and tighten the nuts with the adjustable wrench. Make sure to reconnect any brake or motor components that were detached during the process. Turn the scooter back on, and you're all set!
By following these steps, you'll be able to quickly and easily fix a flat tire on your GOTRAX electric scooter. Always make sure to inspect your scooter's tires regularly and keep them properly inflated to prevent flats in the future.
How To Fix A Flat Tire
Why Is It Important to Get Your Tire Repaired?
If you're driving on a tire that continuously loses air or has a puncture, it is very important to your safety to have it inspected immediately. A service professional should inspect the inside and out to determine whether tire repair is possible or if it needs to be replaced. Flat tire repair services may help to:
- Properly repair punctures in the tread
- Prevent further tire damage
- Maintain tire air pressure at manufacturer recommended levels
There are, of course, situations where tire repair is not the right answer. You should replace your tire, instead of attempting to repair it, if you are dealing with any of the following situations:
- If you notice a bulge or a blister on the sidewall of a tire, you should replace that tire immediately. These are signs that lead to tire failure and could be dangerous.
- If a tire has gone flat due to a blow out, that tire should be immediately replaced.
- If a tire has suffered from lacerations or other significant damage, you should replace a tire immediately rather than attempting to fix a flat tire.
How to Fix a Flat Tire on Your Electric Scooter: A Step-by-Step Guide
Dealing with a flat tire on your electric scooter can be a frustrating experience, but fixing it doesn't have to be. Follow these simple steps to get your scooter back on the road in no time.
Gather the necessary tools: To fix a flat tire on an electric scooter, you will need a wrench, tire levers, a pump or a compressor, and a replacement inner tube.
Turn off the scooter and prop it securely:Before you do anything, make sure your scooter is turned off and propped up securely. You can use a kickstand or a bike stand if you have one.
Remove the wheel with the flat tire: Using the wrench, loosen the nuts on either side of the wheel and carefully slide the wheel off the axle.
Deflate the tire completely: If it's not already fully deflated, press the valve to release any remaining air from the inner tube.
Remove the tire from the rim: Using the tire levers, pry the tire bead over the rim on one side of the wheel. Continue working your way around the wheel until you can remove the tire.
Remove the inner tube: Pull the inner tube out of the tire, starting at the opposite end of the valve. You may need to cut the valve stem if it's irreparable.
Inspect the inside of the tire: Before installing the new inner tube, check the inside of the tire for any debris, sharp objects, or damage that could cause another flat.
Insert the new inner tube: Place the new inner tube inside the tire, making sure the valve stem lines up with the hole in the rim. Gently inflate the tube just enough to give it some shape, making sure it's seated correctly within the tire.
Reattach the tire to the rim: Using the tire levers, reattach the bead of the tire to the rim, working your way around the wheel until the tire is securely in place.
Inflate the tire: Pump air into the tire, checking the pressure as you go. Refer to the scooter manufacturer's recommended tire pressure.
Reattach the wheel: Slide the wheel back onto the axle, making sure it's properly aligned. Tighten the nuts on either side of the wheel using the wrench.
Test your scooter: Turn your scooter back on and take it for a test ride to make sure the tire has been fixed properly and everything feels secure.
By following these steps, you can quickly and easily fix a flat tire on your electric scooter, getting you back on the road in no time. Remember to always carry the necessary tools with you, and inspect your tires regularly for signs of wear or damage.
How to fix a flat tire on your car
If youre armed with the right tools and knowledge, a flat tire is more of a minor setback than a day-ruining disaster. Our step-by-step guide teaches you how to fix a flat tire using a repair kit, and how to replace one with a spare.
Tools youll need
That wheel isnt going to come off on its own, is it? Youll need at the very least a jack and a lug wrench. We recommend using a for added stability, though you might not have access to one if you get a puncture 5 miles from the middle of nowhere. Jack stands and a torque wrench can make your life a lot easier. If your car doesnt come with a spare tire, youll need a repair kit with tire plugs, a probe tool, pliers, and an air compressor. Alternatively, you can use an inflator like to get you to the nearest tire shop. You may also want to pick up a tire pressure gauge if you dont already have one.
Fixing a flat
Normally, one would fix a flat by removing the punctured tire and replacing it with a spare so you can drive to a shop and get a proper replacement.
But lets say the hole in your tire isnt very big, and youre lacking a spare tire. Provided youve got the right tools, a patch kit, and can safely remove a tire and the tire isnt severely damaged, of course this is a viable short-term solution like fixing a hole in a wall. Note that this is a short-term remedy,as patched tires are generally only safe to drive on for about 100 miles, or three days, whichever comesfirst.Much like using a spare tire, this isnt going to solve the issue either. The best solution is to take your car to a professional shop to get it replaced.
Step 1: Remove the wheel with the flat tire
First, youll need to pop off that flat tire. Use a wrench to loosen the lug nuts, but dont remove them from the bolts quite yet. Next, after loosening the nuts, put the jack under (or into) the proper jacking point and make sure to do this on level ground, with the car in park or in gear if its a stick-shift, and the parking brake engaged to prevent it from rolling. Jacking the car on an incline can be extremely dangerous. When its jacked up, you can remove the lug nuts and take off the tire.
Step 2: Find the leak
Once youve removed the tire, its time to find the leak. If you can visibly identify the object thats punctured the tire it could be a nail, a piece of metal, or something else entirely carefully pull it out. A pair of pliers comes in handy here. If you dont know where the leak is coming from, youll need to find it. You can do this by inflating the tire and feeling or listening around the surface of the tire for an opening or escaping air.
Another strategy is to inflate the tire and spray it with soapy water. The escaping air will cause bubbles to rapidly form at the point of the puncture.
Step 3: Plug the hole
Once youve found the hole, ream it out to make sure the plug will fit. Usually, a tool for doing so is provided with yourpatch kit. Next, its time to plug the hole. Apply any necessary adhesives from the kit onto the plug, then insert it into the hole until roughly 2 inches of material is sticking out from the tire. Afterward, let the adhesive dry and cut off the protruding excess of the plug before discarding it.
Step 4: Test the plug
Now, its time to test the plugs seal. Inflate the tire and check for escaping air using either the feeling or listening method mentioned above. Again, you can also use soap and water if youre in need of an alternative method.
Step 5: Refit the wheel
Reattach the tire and lug nuts, but only tighten them enough so the tire will stay on. Do nottighten them all the way just yet. Lower the car to the ground and remove the jack. Once the car is safely stable on all four wheels, finalize the process by tightening the lug nuts in a star pattern, or an X pattern if youre dealing with a four-bolt model. Make sure to followthe torque requirements in your cars manual. This is when a torque wrench can come in handy.
Now, if done correctly, you should be able to get your car to a shop to have your tire replaced. Again, this is not a long-term solution, and you will need to replace your tire within either 100 miles or three days.
Replacing a flat
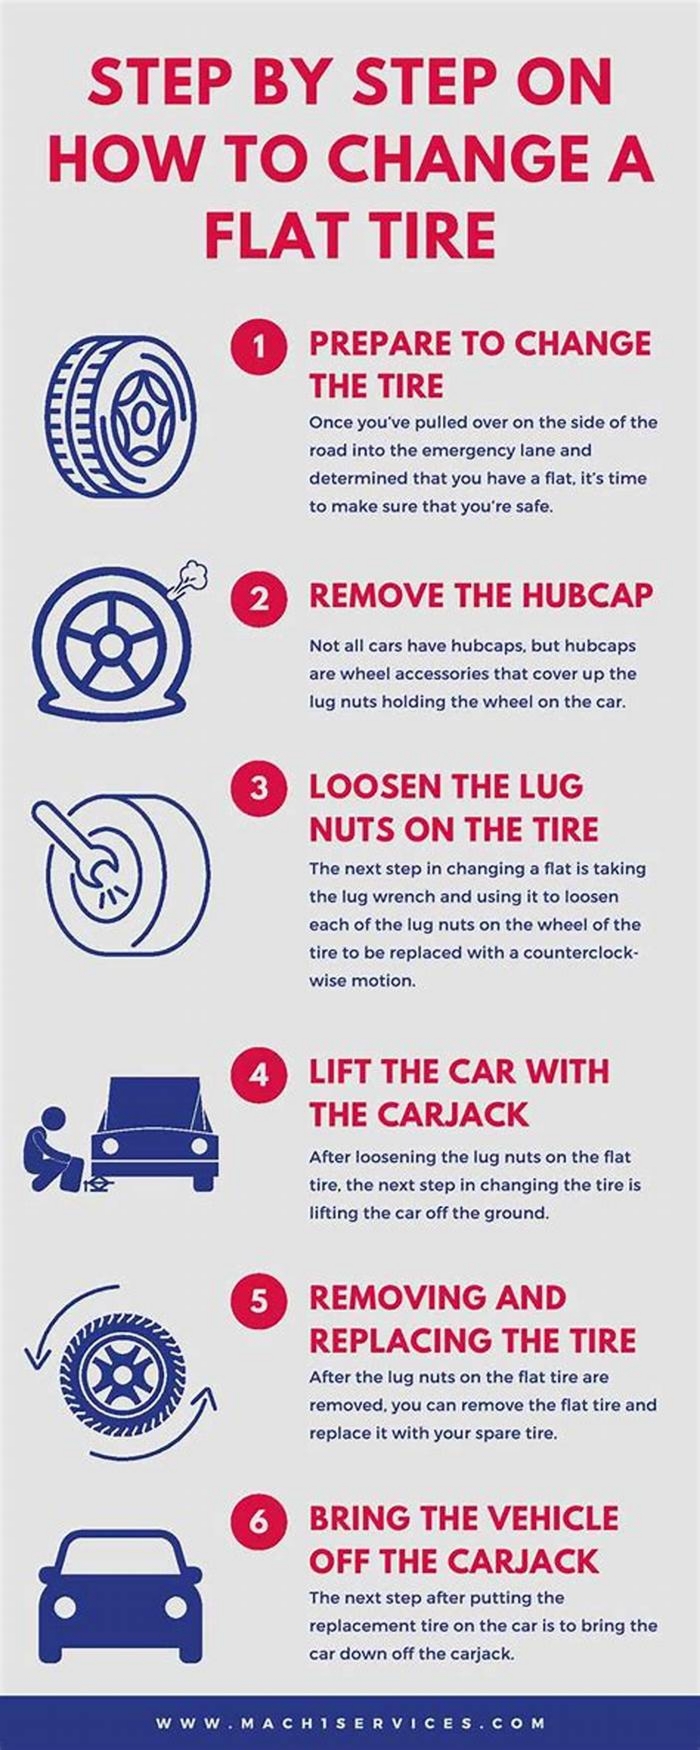
Step 1: Remove the wheel with the flat tire
First, you need to remove the flat tire. Before raising the car with a jack, use a wrench to loosen the lug nuts, but dont remove them just yet. Put the jack under (or into) your cars jacking point, lift the car off the ground, and remove the lug nuts when the wheel is no longer in contact with the asphalt. This needs to be done on level ground, with the car in park (or, if its a stick, in gear), and the emergency brake engaged. Trust us; its much safer this way.
Step 2: Install the spare tire
Before replacing the flat tire, take a minute to ensure the wheel youre about to put on is in acceptable condition. Its not uncommon for cars to have their original, 20-year-old spare still in the trunk, and driving on it will likely land you back in flat-tire territory. If its good, install it and put the lug nuts back on but dont fully tighten them yet. Wait until youve lowered the jack and made sure the full weight of the car is back on the tire.
With the spare in place, you can now drive your car again. Be careful, however, as spare tires are not built to be driven on for very long, and you should never exceed 50 mph when driving with a temporary, donut-style spare. Get the tire replaced by a professional, and consider getting your tires rotated at the same time.

